Friday, July 22, 2011

Well, that was certainly fast...

Today when I checked on the status of my bubbles, I was a little scared when I noticed that it had pretty much stopped.  I also saw a lees was already settling at the bottom!  I stopped and shook it up, checked the temperature, panicked a little.  You know, the norm.

Then, I thought, "maybe the fermentation is just about done?"  So I broke out the trusty hydrometer and pulled a sample.  I got a reading of 1.012, a whopping .09 less than the must started at.  That's an alcohol content of nearly 12% ABV.  The yeast I used had a tolerance of about 13% so it's possible the little guys just burned through it really fast and made so much booze they couldn't handle it anymore!

I'm going to go ahead and rack the mixture so it can settle for a few more days before I move it to a REALLY neat jug I've had around the house for years and totally ignored.  I'll show that off soon as I get it cleaned up!

Tuesday, July 19, 2011

The Math and Science Bit

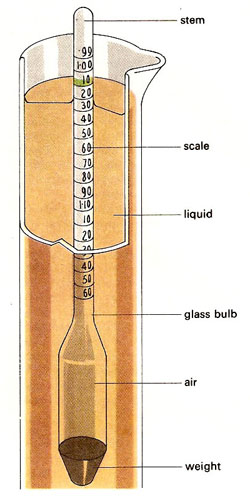
A handy hydrometer illustration
I promised a long time ago, in my very first post, that I'd explain the math involved in using a hydrometer to measure and predict the alcohol content and dryness of your mead or other homebrew (mostly mead, as I'm not really qualified to talk about anything else just yet).  I promised that so long ago, but that was before I was laid off at my old job and things have been understandably crazy since then, but now I'm inspired to finally bring you this information.

Mostly this is for my mead mentor Amber, who is incidentally at her blog talking about mead she is working on and other things.  She mentioned how I never properly explained this math to her, but it is useful to anyone who spent the six bucks for a hydrometer!

To start with, reading the hydrometer and what it actually means.  The hydrometer is a weighted glass tube that floats vertically in a water solution and reveals the specific gravity of the solution.  The specific gravity is based on the sugar content of the solution and is measured numerically from 0.990 and up (but we won't really need too large a range as small changes make a big difference).

During fermentation, the yeast convert the sugar into alcohol and the specific gravity goes back down.  For reference, a change in specific gravity of 0.0075 creates approximately 1% alcohol by volume.  So we can look at the before and after fermentation measurements of specific gravity and calculate the alcohol content.  Warning! Math ahead:

You should have a couple of measurements at this point:
  • Initial Specific Gravity (i);
  • Final Specific Gravity (f);
Which we will take and find:
  • Change in Specific Gravity (ΔG)
    • Equal to (i-f);
Which will give us:
  • Percent Alcohol by Volume (P)
    • With (P=133*ΔG).
Now, the 133 is a number that has a lot to do with differential equations across volume, chemistry and physics, and some extra science you don't need to know.  Just take it for granted that someone else has done this really complicated part to make this math as easy as possible for you.

Also, since the measurement after fermentation is a literal measurement of how much sugar is left in the solution, it can tell us how dry of a drink we've made.  The scale for measuring dryness isn't exact, but there are some approximate guidelines that are generally agreed upon:
  • Dry 
    • 0.990 to 1.006;
  • Medium
    • 1.006 to 1.014;
  • Sweet
    • 1.014 to 1.020;
  • Dessert
    • 1.020 and up.
Now, this final reading and this scale can tell us what we ended up with or it can allow us to predict what we would like to make by setting our goals for (P) and (f) and determining the (i) for which we need to aim to achieve the desired results.

For reaching such a specific target, we need to set up our goals. Though maybe not the easiest decision when considering the ingredients and flavors involved in your recipe, it's a little simpler to decide how dry you want your final product.  Once you have a desired dryness, just pick a target (f) within your range.

Slightly more complicated is deciding on the desired alcohol content.  First, you should know a little something about your yeast, especially it's alcohol tolerance.  Every yeast has an alcohol content that is too high for it to survive and a natural cap to how much it can ferment.  If your local homebrew store can't give you this information, it is readily available for most major brands on yeast reference tables like this one.  You can't plan for a (P) higher than your yeast can tolerate.  On the other side, if you want to ensure something very sweet, you can use a yeast that you know will stop and not over-ferment and leave you with something that's too dry.  Otherwise, once fermentation slows down you can take regular readings until you have reached the desired dryness and then stopping fermentation manually.

In any case, once you decide on your desired alcohol content, you just use the reverse engineered formula:
  • Desired Alcohol Content (P);
  • Desired Final Specific Gravity (f);
  • Gives Target Initial Specific Gravity (T)
    • T=(P/133)+f.
As you mix up your solution before fermentation, you can add more honey or any other ingredient you have with more sugar to raise the initial specific gravity, or conversely water or any ingredient with less sugar in it to lower the initial.  Once your hydrometer says you've hit your goal, you have a very predictable and controllable fermentation cycle ahead of you!

Saturday, July 16, 2011

Update! Bubbles!

So, the yeast I pitched just a mere 4-5 hours ago is already hard at work.  They got the airlock bubbling on a 2-3 second pace.  It's good to know things are working so well already!  Very reassuring.

Project: Cherry Melomel

Beautiful, isn't it?
Today, after long not keeping any information on this blog I started five months ago, I made my first solo mead experiment: a cherry melomel.

I assume you wouldn't be reading here on my little site unless you already know that mead is a wine-strength drink made with honey instead of grapes.  But, it could be likely that you don't know what I mean by melomel.  This is pretty simple, it's mead that is made with the addition of fruit!

I've been planning and scheming what my first creative foray into the world of a mazer would be, and cherries were high among my potential ideas, along with mango and some other more adventurous ideas.  But, I found some fresh local cherries readily available and my impulsive nature made the decision for me.

In planning for my first brand new recipe, I tried to keep in mind every thing I have read about mead and everything I know about the culinary arts in general.

First, an important lesson I learned from my first batch: honey alone does not really have the nutrients yeast need to live and work for the full fermentation.  I had read this going in, but decided not to add any artificial nutrients and just follow the directions of my instructor, Amber of Pixies Pocket.  The batch turned out well, but the fermentation stopped early, leaving me with only a 9.5% alcohol content and a mead that was sweeter than I had expected.  It's still really good, though!

So, this is actually of little concern for my new batch as the fruit will add extra nutrients that should help counteract this problem and keep my yeast going strong until they either run out of sugar or the alcohol content gets too high for them to survive.  I'm actually aiming for the latter, as the yeast I have will survive up to about 12-13% ABV, and I would like to have enough sugar left for a medium dry batch.  Using the math I talked about in my first post, this should be a simple calculation.  I'll aim for about a 1.1 specific gravity.

Another thing I wanted to keep in mind is the flavor elements that I added.  I do consider the aromatics as well, but right now I'm specifically talking about the five tastes: sweet, sour, bitter, salt, and umami.

  • To start off, no salt.  People who talk about tastes will tell you everything needs a very specific concentration of salt, but c'mon, this is mead.  It just seems like a good way to screw the whole thing up.
  • Sweet is covered and then some by the honey itself.
  • Cherries add some sugar but also a tartness that generally is considered sour.  Just to makes sure sour is covered, I chose to add just a little bit of lime as well for the acidity and a touch more sweetness.
  • While I was at it, the oils from the lime peel will be good, and the white part can help with some bitterness.  Everything I read about mead recommended not using citrus peel as the bitterness can be unpleasant.  I only planned to use it while brewing the must and not to have any of the bitter peel in the fermenting or aging process.
  • Umami may be an unfamiliar thing for many people, but it's what is generally considered to be savory.  There are some spices that can cover this, but I wanted to stay away from spices for the time being.  Instead I went with green tea leaves which server to add this umami element and also some tannins which mead can easily otherwise lack.
So I had an ingredient list, here is how I put this all together for a 1 gallon batch:
I tried it, it's really good.
  • 1 gallon water
  • 8 cups honey (approximately 4 lbs.)
    • Honey is usually done by weight, but I've found that 1 cup is a little less than half a pound on average.  I used Wildflower Honey from Carl Edwards in Murphy, NC which is available locally in my area.
  • 1 lb cherries (frozen)
    • Immediately after buying some nice fresh cherries, I washed them and put them in a big bowl and froze them.  This creates ice crystals that will break down cell walls and allow the berries to more easily release juice.
  • 2 limes
  • Green tea leaves
    • I had loose tea leaves available because I drink this all the time.  This is not to be the primary flavor, so for my gallon of water, I used the amount of tea recommended for half a gallon of tea.
Science About to Begin
I got out the jug in which the magic would happen, a nice 2 gallon pot, a large wooden spoon, a measuring cup, a ladle, a culinary funnel, a floating thermometer, my hydrometer with it's tube, the rubber stopper and airlock and sterilized everything with a little bit of bleach and water and rinsed it like mad.  I laid it all out on a towel and got out the cutting board and the ingredients and got ready to go.

  • Using my 1 gallon jug to measure the water, I put it in the pot and turned up the heat.
  • Just as the water was starting to form some bubbles and was only a couple minutes from boiling, I added the cherries.  This dropped the temperature significantly and slowed down the boiling, but also shocked the cherries and got them thawing very quickly.
  • While the water was heating back up, I took my limes and washed them off.  Then I cut the tops and bottoms off allowing them to stand up easily.  While standing, it was simple to shave off the peel in neat strips with my knife.  Once all the peel was removed, I squeezed the naked fruit thoroughly into the water and then added the remaining pulp and all the peel of both limes.
  • Next, I simply tossed in the tea leaves to do their wonderful thing.
  • While the water approached boiling, I stirred the mixture with a wooden spoon to keep the cherries on the bottom of the pot from scalding.
  • As the cherries thawed, they would float to the top of the soon-to-be must.  When they floated up, I would mash them against the side of the pot with the wooden spoon, being sure that the seed came out.
  • Once the mixture started it's rolling boil, I removed it from the heat and allowed it to calm down.
  • Then, I added the honey, stirring constantly to make sure it dissolved thoroughly.
  • Once the jars stopped pouring, I took about 1/4 cup of the must and added it to the honey jars and shook it up to dissolve any remaining honey and poured this mixture back into the must.  This is a very tricky way to do this and can result in the jars shattering if the glass can't handle the heat.
  • Once the jars were completely empty, I added my floating thermometer to the must so that I could track the temperature of the must.
  • I partly filled my sink with cold water and carefully set the pot with the must in the sink to help it cool off.
  • I continued to stir and smash cherries while the must cooled.
  • Once the temperature reached about 110ºF, I removed it from the water to slow down the cooling process.
  • By this point, the volume of the must was closer to 2 gallons, so I pulled 1/2 gallon out (into the original honey jars) to save for later.  If the remaining liquid was less than a gallon, they could be added back into the fermenter.
  • When they remaining must was between 100-105ºF, I pulled 1/4 cup out and added the yeast to activate it, then returned the active mixture to the must and stirred it all together.
  • Once it was mixed back together, and cooled to closer to 80ºF, I used a ladle and funnel to begin moving the mixture to the fermenter.  It was okay to get some of the fruit pulp into the ladle as long as it did not clog the funnel and as long as none of the seeds or lime peel made it into the jug. Doing this in small amounts with a funnel allowed oxygen to mix in well with the must which will keep the yeast happy and healthy during fermentation.
  • Once the jug was about half full, I capped it and shook it vigorously to mix in even more oxygen.
  • I switched back to the funnel and continued adding the must until the jug was filled to 1 gallon, pretty much perfectly without having to add any of the excess half gallon I had saved earlier.
  • I then capped the jug again and set the airlock into place primed with some nice whisky.  The alcohol in the airlock will keep the mechanism itself fairly sterile and safe during the fermentation process.
  • Cooling Must
  • From the remaining must, I took the final 1/4 cup to take a reading on the hydrometer.  The reading came back at 1.102; pretty much perfectly what I had aimed for!
This process resulted in a gallon of the most beautiful burgundy mixture I could have imagined.  Now I just have to survive the suspenseful next couple of days while fermentation begins.

I'll report what happens as soon as there's news!